Automated Battery Testing Using Monsoon Python API

This article is intended for those who are particularly interested in creating an automated battery testing setup. It’s important to note that most of the battery is used by the screen itself, by pressing buttons or entering text in fields. Each application will have different results. Battery tests are related to performance testing and are typically performed in parallel, for example, evaluating CPU, memory, network and other metrics.
Battery tests can help reduce battery usage of your application or service. You can run battery tests on three operating systems: macOS, Windows and Linux. To run battery tests, you will need a high voltage power monitor (HVPM) or low voltage power monitor (LVPM), as well as software and a battery device. When using Windows, both a HVPM and LVPM are suitable. To obtain battery data for Windows, we use the Power Tool. With Linux and macOS, we use the Monsoon Python API library written in Python to run battery tests and gather data. And in the case of macOS and Linux, it is necessary to use a HVPM. This is because older firmware uses a serial port emulator to communicate with the PC, while newer firmware uses a full USB interface.
Battery device
The battery device for tests can be made almost out of any device that has a battery, but in this particular automation setup, there is an iPhone 12 set up for these tests.

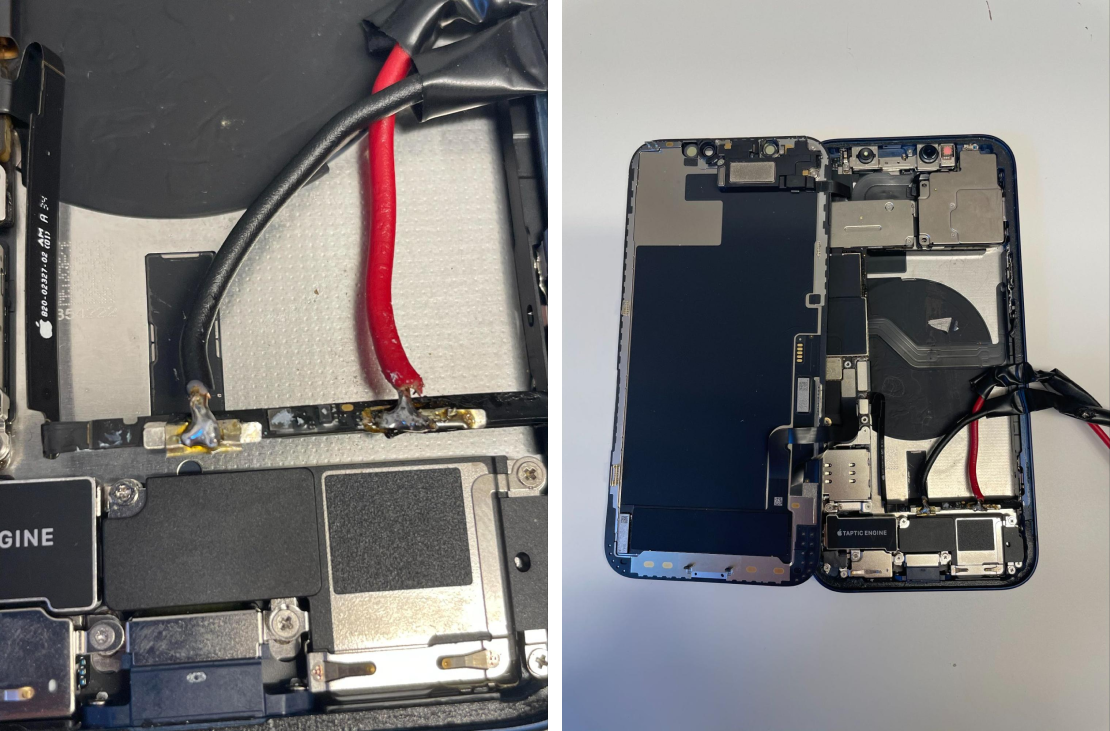
Here is the methodology for creating a battery test device:
- Take the device apart
- Disconnect the battery from the motherboard
- Take apart the battery itself by removing the battery’s logic board
- Inspect the logic board and decide how to prepare it for the Monsoon Power Monitor
- Prepare the soldering setup:
- Cables
- Copper tape
- Soldering surface
- Once the cables are soldered to the logic board, put it back into the phone and connect it to the motherboard
When the device is prepared, we connect it to the Monsoon Power High Voltage Monitor. When battery profiling, the Monsoon High Voltage Power Monitor provides constant voltage to the test device and the hardware measures the changes in the amperage, thus establishing a power usage profile. For the sake of simplicity and efficiency, we execute the tests with the Monsoon Python API which is provided by Monsoon.
From the Power Monitor we can get the following metrics:
- Battery capacity - milliampere-hours (mAh)
- Consumed energy - milliampere-hours (mAh)
- Current usage - amperes (A)
- Power usage - watts (W)
- Voltage - volts (V)
- Expected battery life - hours (h)
The only preconditions needed to start the device is to have the + and - cables, and the lightning cable attached to the Monsoon Power Monitor with the voltage set at 3.85V, simulating a real battery voltage. Once tests are initiated, the Power Monitor disconnects the USB connection with the phone so it can begin the profiling of the battery usage. After a test run we can see an overview of an overtime graph of changes in milliwatt (mW) usage, where we average all the samples per second gathered from the Power Monitor hardware to one sample per second.
We can see the full log from the Power Monitor with all the recorded metrics in the form of binary .pt5 file - 5000 samples per second.
Automation
As mentioned above, battery tests are very useful for all applications. Battery tests can help you understand which scenarios are the most resource-intensive, after which, based on the testing data, you can optimize the process. For example, you can reduce the quality of a video call or increase it if the results are much lower compared to other applications. Let’s take a look at how automated battery testing can be executed on different operating systems.
- Windows: To automate the battery test, we use the command line from the power tool. The command line allows you to use it in a script to run battery tests along with other performance tests. To automate scenarios on Android devices, we use Appium.
- macOS: With macOS, everything is somewhat more complicated because in order to automate scenarios on Apple devices, you need to use Appium and Xcode. If Appium works on both Windows and macOS, then Xcode only works on macOS. That is why automation on macOS is somewhat more complicated than on Windows. Additionally, the power tool is not supported on macOS, so we use the Monsoon Python API to solve the automation task. Our setup works on the basis of the Intel processor, it has not yet been tested on an M1 chip.
Setup
Our setup consists of four devices, one of them is a battery device, the rest are support devices. The battery device is the main device that will collect all the data during the test. All devices are connected to a computer and are in a black box in order to get the most accurate result without extraneous light. Also, all devices are directed to the monitor, and during the scenario with a video call, a video with a person is displayed on the monitor to simulate a video call If necessary, you can connect the sound to the battery device.

Code example
To get started you need to prepare the script to run the battery test:
Monsoon Python API supports macOS, Windows and Linux. For Windows it is recommended to use software developed by Monsoon, as their software has more options than Python API. In our build we are using macOS on an Intel chip. To successfuly run battery tests, you need: Python, PyCharm (or another IDE for Python), Monsoon library, NumPy, and PyUSB.
You also need a High Voltage Power Monitor (HVPM). For Low Voltage Power Monitor (LVPM), the firmware on your device will probably not be compatible with the script. Older firmware uses a serial port emulator to communicate with the PC, while newer firmware uses a full USB interface.
When you have everything, you should connect the battery device to our battery box and connect the battery box to the device, in our case a MacBook. After you do that, turn on the battery box and if there is green light on the box, all is going fine. Then you can insert the code below into the IDE and run the script. The code will start the device.
def start_battery_test(path, file_name):
Mon = HVPM.Monsoon()
Mon.setup_usb()
Mon.setVout(3.85)

engine = sampleEngine.SampleEngine(Mon)
engine.enableCSVOutput(path + "/" + file_name + ".csv") engine.ConsoleOutput(True) numSamples=sampleEngine.triggers.SAMPLECOUNT_INFINITE engine.setStartTrigger(sampleEngine.triggers.LESS_THAN, TIME) engine.setStopTrigger(sampleEngine.triggers.GREATER_THAN, TIME) engine.setTriggerChannel(sampleEngine.channels.timeStamp) engine.startSampling(numSamples)
When the device is enabled you can interrupt the program and insert the function. This will start the battery test and save all the information into a .csv file.
When the test ends, your .csv file will look like this:

You should write some code to process that data and convert it to mW. You can do this by using the formula: mW = mA * V * 1000.
How to implement automated battery tests
We should create one more function where we will use multiprocessing.
def battery_test():
    battery_test =	multiprocessing.Process(target=start_battery_test, args=[])
    battery_test.start()
    battery_test.join()
The process accepts two arguments, the first is function name and the second one is arguments for that function which is the path where you will save data and the other one is filename. After you create the function, you can use it and implement it in your automation. You can run battery tests only in a long-term process, when the app you are testing starts an audio call, video call, stream or video. This is due to the fact that during the battery test, the computer and the device stop exchanging data via USB and only data is measured. In order for the battery device to continue working, it is necessary to restart the driver after the battery test. Therefore, in case of scenarios where the device needs to press buttons, type messages, or check the visibility of an element, you will not be able to use battery tests.
Conclusion
Creating an automated battery test from scratch was a challenge from the coding point of view, as we were previously testing battery usage manually. Therefore, we already knew all the steps that needed to be completed—from test preparation to validation—and all we had to do was set up the automation process itself and apply it to Windows and MacOS computers so both platforms can execute tests, Android for Windows and iOS for MacOS.
The main benefit of automated battery testing is that we have more time for other projects and since tests can be executed overnight, more tests can be done in a shorter period of time. Namely, tests that used to take us a week to execute, now take us just 2 to 3 days. So though we can agree that writing an automated battery test from scratch is exhaustive, once it's done, more tests can be run faster, leaving you with more time to focus on other projects, which is also cost productive.
Do you need help setting up automated battery testing and streamlining your testing process? Contact us to learn more about our battery and data usage testing services.