Here’s the problem. Usually when automated software tests are executed on mobile devices, these devices are constantly connected to different devices (computers, power sources etc.) via USB port. USB connectivity not only allows device control during the tests, but also charges the device. Continuous testing affects mobile device battery life and can even harm the battery, which is common for Android smartphones. It seems that iPhones use a “smarter” battery controller.
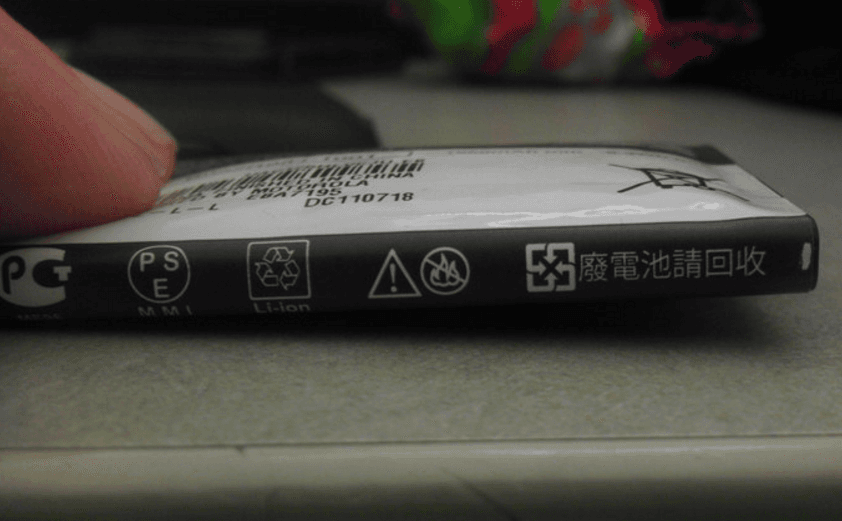
In the header of this post is an example of a Li-Ion battery of a smartphone that has been constantly charged during extensive use. The battery not only damages the mobile device when it’s bloated but also can harm the user and even catch fire. So the problem is real!
Few tips to prolong battery lifetime
It’s possible to limit USB device charging, as well as charging the devices cyclically, hence mitigating the battery malfunction issues. Different sources suggest the following tips to prolong battery lifetime:
- Avoid complete battery charge/discharge cycles – so called deep cycling reduces battery capacity for a significant percentage after each charge cycle. It’s suggested to start charging a battery while it still isn’t completely empty.
- Maintain the battery temperature lowered and cool down the battery. The overheating that is often caused by battery usage during the charge cycle or intense usage of the mobile device rapidly decreases the capacity and increases the risk for the battery to malfunction. You can cool the battery by making sure it has access to air (aka not confined to the mobile device). Just set it aside to take a breather.
- Avoid ultra-fast charging. Slower battery charging does not heat up the battery as quickly. This can be achieved by using chargers with lower amps.
As you can see in the picture above, through extensive testing on smartphones and charging these devices constantly, the internal device battery of different manufacturers bloats and stops functioning. This also damages the housing of the device. In the case of bloating, the internal battery circuits have thermal protection mechanisms designed to prevent thermal overheating, fire and explosion hazards. The internal thermal fuse usually melts and makes the battery completely unusable.
The answer: USB hubs that have switches or smart hubs
Such hubs support multiple mobile device USB connections to the computer. Unfortunately even smart USB hubs can’t sense when the device shouldn’t be charged. Several USB hubs are commercially available that have physically on/off switchable power for each individual USB port. There also exist small hubs with programmatically switchable ports, but these are an expensive solution for test automation projects that have large amounts of mobile devices.
Our solution here is a USB hub that features a programmable charge cycle. By taking into account that the USB hub will host a substantial number (8+) of mobile devices of different vendors, individually switchable ports are required. Individual access to ports enables us to adjust the charging cycle for individual devices for the planned test automation project. It’s possible to use the USB hub for various other examples of USB devices like USB Flash dongles, network adapters etc.
The solution consists of three main parts: the USB hub, an Arduino Nano charge controller and a USB 8 port switch circuit. The solution component connection scheme is shown below. The USB hub is connected to the computer and it can host up to 10 USB devices. Eight of the hub ports are directly connected to the USB switch. The switch can disable power supply to each individual mobile device that’s connected to it. The switch is controlled using an Arduino Nano – a small embedded microcontroller that’s perfect for small projects. The Arduino is also powered from the USB hub and is connected to it so that the computer only has one physical USB connection to the solution.

Here’s a closer overview of the solution components
- Arduino Nano. This is the most basic embedded board from the Arduino family. It has the right number of pins and amount of memory for this project and it’s powered by the 5 volts of the USB hub. The programming of Arduino firmware is simple – it’s attached to the USB port of the computer. Arduino programming IDE is used to flash the firmware in seconds. For this project, our Arduino uses the Firmata firmware library that’s available in Arduino IDE. A lot of tutorials exist on how to flash the firmware in just a few steps. D2-D9 digital pins of the Arduino are used to further control the USB switching circuit with digital signals.

- USB switch. A simple electronic circuit connects each mobile device to the USB hub. The +5 volt terminal of the USB is controlled by the transistor’s logic. As soon as the power circuit for a mobile device is cut, the device disconnects from the USB port – both power and data transmission of the USB device are disconnected and the USB device becomes no longer available on the host computer. An example circuit of a single USB switch is seen in the schematic below. The circuit consists of a pair of MOSFET switching transistors and a couple of resistors. The switch consists of 8 such circuits to ensure parallel control of individual USB connections.

- USB hub device. Any USB hub can be used in this project. The hub must have an external power supply to power all of the connected USB devices. Usually the USB port of a single device must supply up to 500mA of current. Smaller USB hubs usually don’t have the external power supply and can fail due to the fact that a bigger mobile device, like a tablet, can draw 1A + current during the charging.

- Computer software. For this project the computer runs a small server that interfaces the Arduino and also supports the switch scheduling feature. Software can be made using Node JS and use the JohnnyFive Framework library for interfacing with the Arduino. The Socket.io JS library is used to create a simple websocket server on the host machine. This approach allows the host to be reachable by remote projects like Jenkins CI build server that runs test automation projects and scheduled scripts as this solution is mostly intended for continuous test automation. Websocket Client scripts create short but persistent remote connection to the server and then can asynchronously control the designated ports of the USB hub. Several separate projects can simultaneously use the hub service in parallel and have different scheduled test cycles so that each individual device is bound to the specific test job and its planned test schedule.

We have a few hundred test devices and some of them are heavily used in automated testing projects. So it’s important to try to prolong their battery life, because it can become a problem finding a replacement battery. Especially for older devices. This is our solution to this problem.
What are you doing to keep devices in good working order? Contact us to learn how we can help.


