
There are many useful libraries, like REST assured which is a Java-based library, that can be used to automate API testing. These contain a few code snippets that can be reused in test cases. Although they’re very useful for automation engineers, there is another tool that can help you better understand API testing without having to know a programming language. Postman is an API testing tool that allows you to perform comprehensive testing faster. It offers:
- a simple user interface where each integral part of the API lifecycle can be easily visualized and understood.
- pre-built code snippets that can be used for verifying tests or for generating test data used in tests.
- a wide range of options, for example, testing on different environments, testing on different servers, documentation of the API, collaboration and sharing the API with teammates or with the world.
My aim in the blog post is to introduce Postman as a useful tool for API semi-automated testing. I will provide screenshots of practical examples in Postman using a test API. I assume that you’re already familiar with the API concept and understand the basics. If not, then I highly recommend reading one of my previous articles—Understanding APIs: Simplified Guide for Beginners, before proceeding with this one.
What is Postman?
Abhinav Asthana, a software engineer who wanted to simplify API testing, started Postman as a side project in 2012. Postman is an API platform for engineers to design, build, and test their APIs. It simplifies each step of the API lifecycle and streamlines collaboration. As a result, teams in an organization can create better APIs in an easier and faster manner.
At its core, Postman allows users to easily store, catalog, and collaborate around all API artifacts on one central platform. Postman can store and manage API specifications, documentation, workflow recipes, test cases and results, metrics, and everything else related to APIs. Postman has over 20 million registered users as of today.
Postman installation and user registration
Postman can be downloaded from here. You should be able to select the correct operating system. If you’re using macOS, make sure to download Postman for the correct chip under which your laptop is running.
If you don’t want to install the app, Postman offers a web version as well, but to access it you have to create a Postman account first—if you don’t have one already.
To use the desktop app, you don’t have to be a registered user, however, not all features will be available.
Getting started with Postman
Postman’s central view is the workspace where all the things we’re going to use are positioned. Workspaces help us organize our API work and collaborate with teams across the organization. Inside our workspace we can access collections, environments, mock servers, monitors and other Postman features. Collection is a group of saved API requests, while environments is a set of variables that we can use in the requests.

How to structure a collection in Postman
As mentioned above, we group all API requests in a collection, but we also group our API tests in a collection. This means that the collection is a root folder of our project. Inside it we can organize our work in folders and subfolders. It is up to you to decide how you would like to structure the collection, however, the most common practice is that:
- Folders are created for every endpoint. The name of the folder is usually the name of the endpoint.
- An Integration tests folder can also be created where we can place API tests that test the connection between different API endpoints. Namely, when we want to chain multiple API requests to test, for example, if the data in one endpoint is present in the other related endpoint.

Practical examples using Postman
I will use the Petstore API from Swagger for the examples. I’d also like to encourage you to take the time to explore the documentation, if available, for every API you use. Exploring the documentation will give you a clear overview of the API, what is expected in each request, and what response you will receive for it. The documentation for Petstore API is available here.
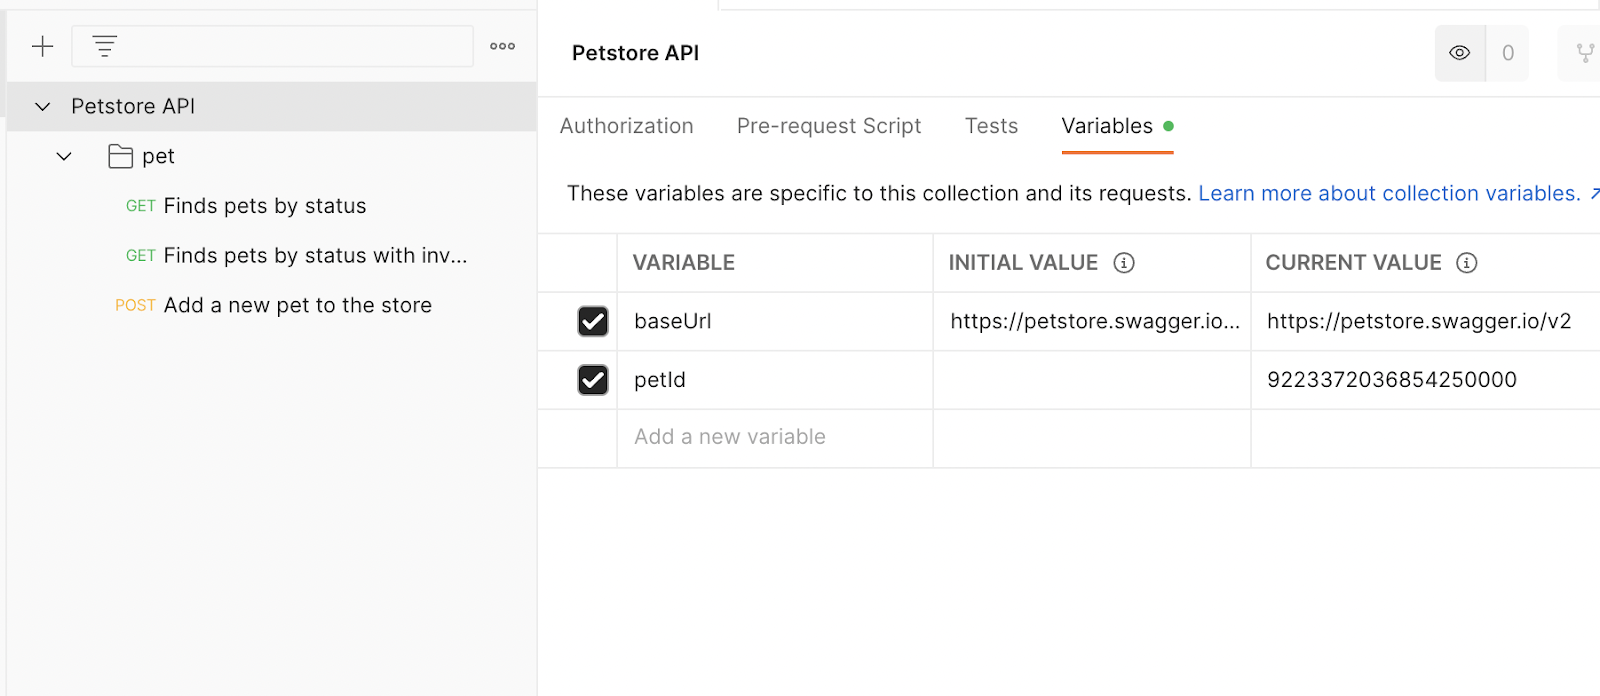
In the documentation, the base URL of the API is written as: petstore.swagger.io/v2. Since the base URL is the same for every API request, it makes sense that we store it as a variable in our collection so that we can reuse it. To do that, follow these steps:
- Select the collection in “Collections” tab.
- In the collection’s view, select “Variables” tab.
- Populate “Variable name”, “Initial value” and “Current value” columns with respective values: baseUrl and https://petstore.swagger.io/v2.

Create GET request and test for it
The first request we’re going to create in Postman is the GET request for finding pets by status. The endpoint for this request is /pet and the request parameter is /findByStatus. We can also observe from the documentation that this request requires a status query parameter and the values for the status that are accepted are: available, pending and sold.

To add the request in Postman, follow these steps:
- Right click on the collection in the “Collections” tab.
- Choose the “Add folder” option. Name the folder “pet” because we will place all requests for /pet endpoint in this folder.
- Right click on the “pet” folder and choose the “Add request” option.
- The request view will be displayed. We should populate all the required information for the request here. For now, we will set just a name for the request.

GET is already set as the default option in the drop down for request method, therefore we don’t need to change it. We should enter the request URL, here we will insert {{baseUrl}}/pet/findByStatus. If you remember, we’ve already added baseUrl as a collection variable, so we can use its value by wrapping the variable name in curly brackets. This way, we don’t need to specify the full URL in every request. Under the “Params” tab, we can enter query parameters. For our request, we need to enter the “status” query parameter and any accepted status as value. We can use “available” as a status value for this example.
Now that we have entered all necessary data, we can hit the “Send” button to send the request and observe the response we receive from the server. The response is received in the “Response” section at the bottom of the view. The data is received in JSON format, and we can easily observe all the information of available pets, like name, photo URLs, categories, etc.
The next step is to add tests for the response we received. We want to test if we received a successful response (status code is 200) and if the data in the response body contains a pet with the name “doggie”. Tests can be added under the “Tests” tab. On the right side, next to the input field, we already have predefined JavaScript code snippets for most common test cases. Scroll down a bit, and look out for the snippets with names: “Status code: Code is 200” and “Response body: JSON value check”. These snippets can be used for our test cases. If you’re familiar with JavaScript, you can add more code here and test the response more thoroughly.
For our simple test we will modify the second code snippet, so that from the list of all available pets we will check if the first pet has the name “doggie”.
pm.test("First pet check name", function () {
   var jsonData = pm.response.json();
   pm.expect(jsonData[0].name).to.eql("doggie");
});
To run the tests, we have to send the request again. Test results will be available in the “Response” section under the “Test Results” tab. If you click on this tab, you can easily check which tests passed or if some tests failed.
Our second test case will fail sometimes because every time the request is sent, the API responds with available pets at that particular time. This means that “doggie” may not be available the next time we send the request and that’s why the test might fail. We should design our test cases to be better than the simple example above, they should always be consistent with the end use case we want to check and with the API state.

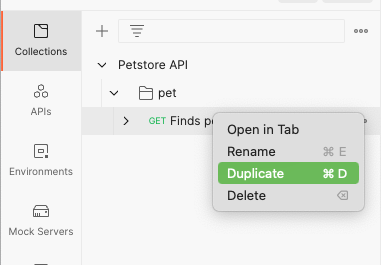
We can also check and test what happens when we pass invalid status value. The documentation states that in this case we should receive the 400 response status code. We can add this example in our request, also we can test this expectation. We can duplicate our existing request by right clicking on it and choosing the “Duplicate” option.
We set a new name for the request so that we distinguish that it is for an invalid status code. Also, we modify the value of the “status” query parameter and add an arbitrary value. In the tests, we remove the second test case because we don’t need it for this request, but we also modify the first test case to check if we receive the 400 response status code.
pm.test("Status code is 400", function () {
   pm.response.to.have.status(400);
});
If we send the request, the test should pass.
Create POST request and test for it
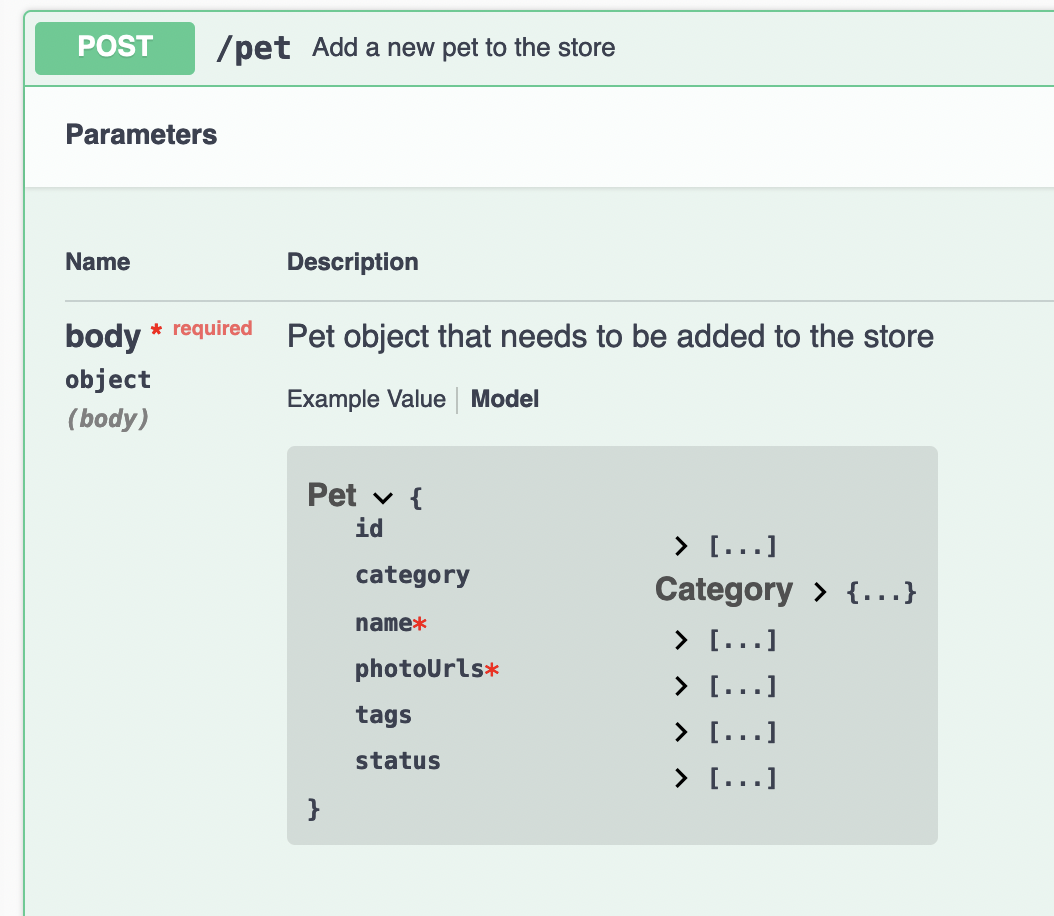
How about we add a new pet with the name Dogo to the pet store? For this we can use the POST request, which is the only request that changes the server by adding a new object. From the documentation, we can see that the endpoint for adding a new pet is just /pet without any request parameter. A request body is mandatory, as is with every POST request. We can see from the documentation that the body should be given in JSON format and the required data that should be provided is pet’s name and photoUrls.
Similarly, as we did with the GET request, we will add the POST request under the “pet” folder:
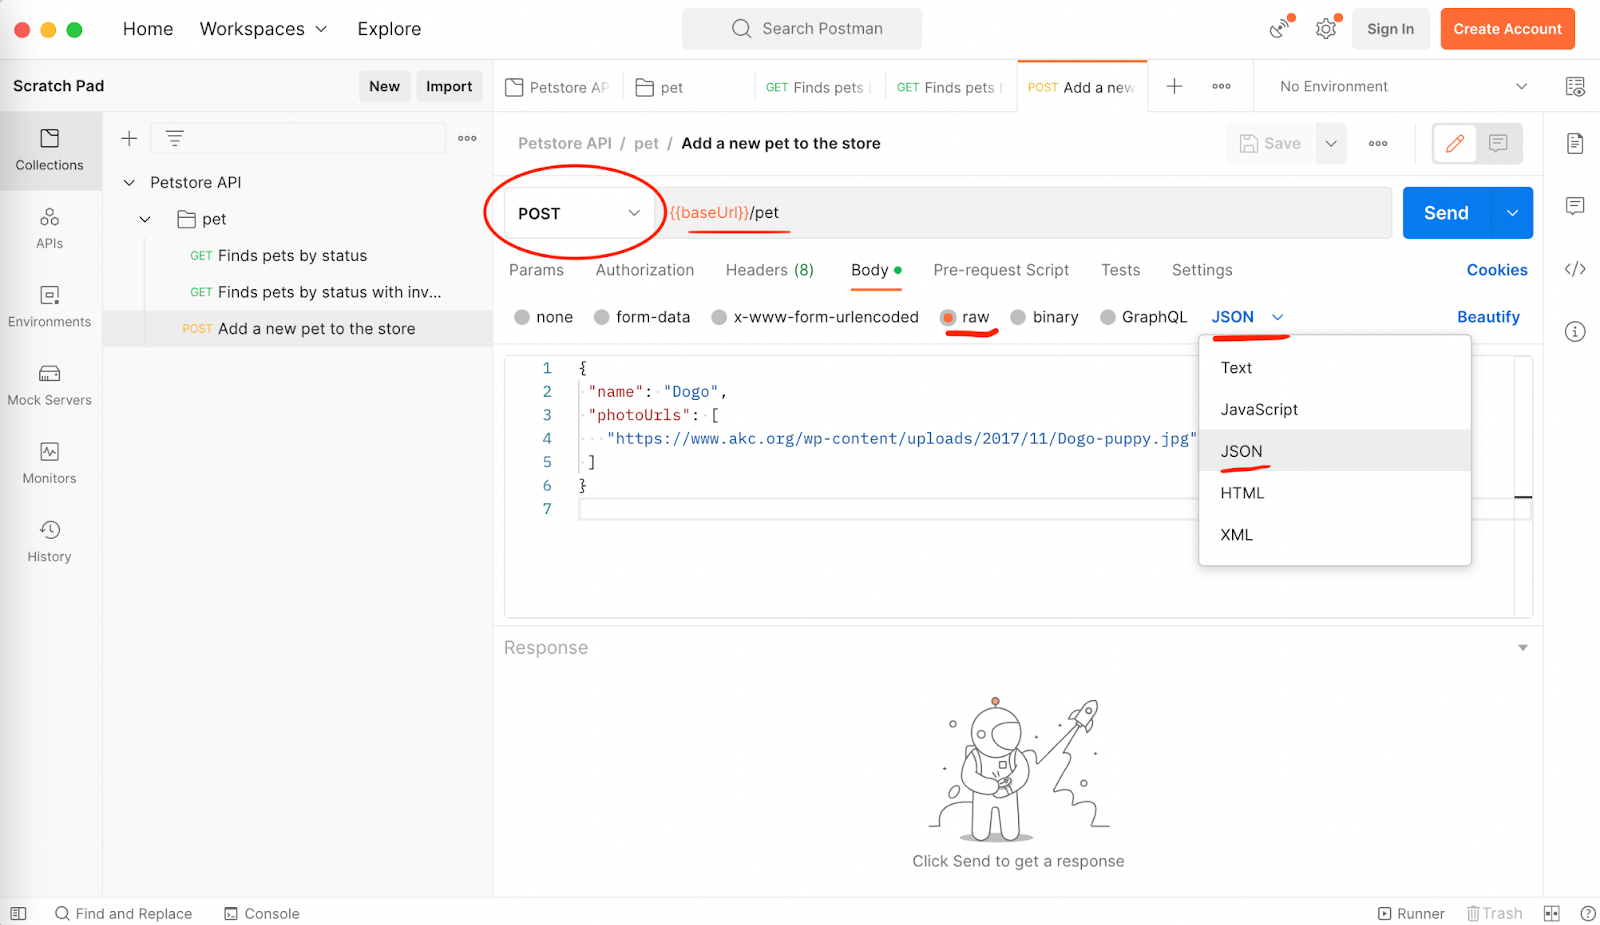
- Select “POST” from the drop down menu.
- Enter {{baseUrl}}/pet in the request URL input field.
- Select the “Body” tab below the request URL input field to add the JSON request body.
- Choose the “raw” option and select JSON from the last drop down view in the row.
- In the input field below the body format options, we should enter the following body:
{
 "name": "Dogo",
 "photoUrls": [
   "https://www.akc.org/wp-content/uploads/2017/11/Dogo-puppy.jpg"
 ]
}
If we execute this request by pressing the “Send” button, we should receive a successful response. The response should contain data we already provided with additional information, like ID.

It's fairly simple to construct a test for this response, we want to make sure that the added pet is indeed with the name Dogo and with the correct photo URL. Similarly as with the GET request, we can use already existing snippets for checking the response status code and values from the JSON response. Our tests should look like this:
pm.test("Status code is 200", function () {
   pm.response.to.have.status(200);
});
pm.test("New pet response check", function () {
var jsonData = pm.response.json();
pm.expect(jsonData.name).to.eql("Dogo");
pm.expect(jsonData.photoUrls[0]).to.eql("https://www.akc.org/wp-content/uploads/2017/11/Dogo-puppy.jpg");
});If we run the tests, they should pass.

We can also play around with the request body and try to send invalid data or data without mandatory values. It’s recommended to construct tests with expected response codes, trying to cover as many negative and positive scenarios as possible.
Create PUT request and test for it
What if you want to change the name of your pet and update the status to sold? We know that the PUT request can modify the server so that an existing object can be updated with new data. But from all the pets in the store, how will the server know which one is your pet? If you observe the response from above closely, where we added the pet to the store with the POST request, you’ll notice that there is an ID in the data. This ID is the identification of the pet whose data we want to update. We can use this ID in our request for updating the name of our pet and the status. However, it’s not optimal to copy and paste the ID. We want this ID to be stored as a variable and then used in our update request. Luckily, Postman allows us to store data from responses as variables too, just like we stored the base URL in collection variables. Let’s store the ID of the previously created pet. In Postman, follow these steps:
- Open the POST request you created previously.
- Go to the “Tests” tab.
- From the snippets on the right, choose the one with the name “Set a collection variable”.
- The snippet should be copied at the end of the test. Move the snippet in “New pet response check” test and modify it like so:
pm.collectionVariables.set("petId", jsonData.id);- Run the tests again. This is important so that with the new code snippet, the ID can be saved to collection variables.
You can check if your ID is stored by clicking on the collection, then selecting the “Variables” tab. The petId variable should be listed below the baseUrl variable.
Now that we have the identification of our pet we can update the name and status with the PUT request. From the documentation, we can see that everything is the same as with the POST request, the only difference is in the request method. Repeat the same steps as with the POST request, but make sure to select “PUT” from the drop down menu for the request method and send the following request body:
{
"id": {{petId}},
"name": "Lucky",
"status": "sold"
}
We wrapped our saved pet ID with curly brackets in the request body. The created request in Postman should like this:

Run the request and observe the response. New data should be visible in the response.
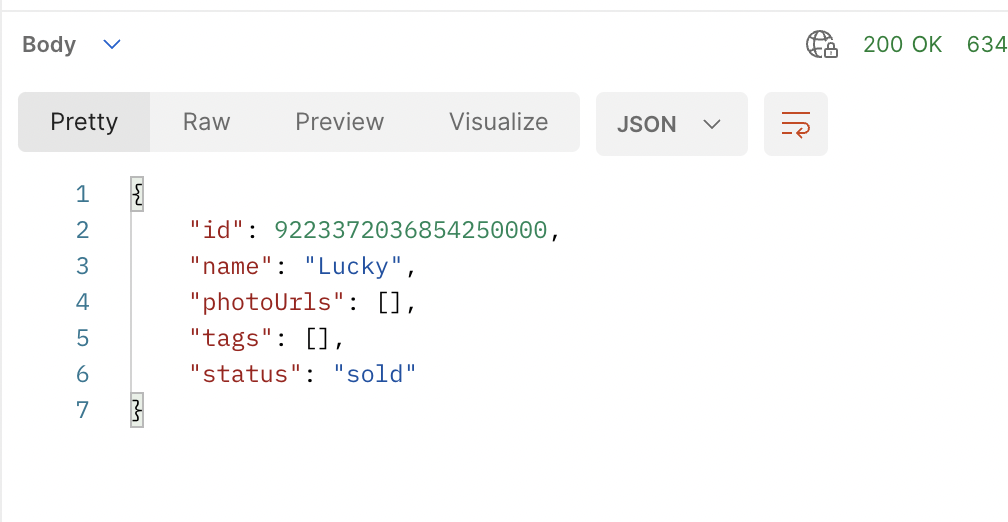
We can add similar tests as with the POST request to check if the pet’s name and status are updated. The tests should look like this:
pm.test("Status code is 200", function () {
   pm.response.to.have.status(200);
});
pm.test("Pet update check", function () {
var jsonData = pm.response.json();
pm.expect(jsonData.name).to.eql("Lucky");
pm.expect(jsonData.status).to.eql("sold");
});When we run the tests, they should pass.
Create DELETE request and test for it
Now, let’s imagine that the pet store has sold the dog Lucky and he is now happily living with me. I can safely delete the data of my pet from the server by using the DELETE request. The documentation states that the pet ID should be provided as a request parameter to the endpoint.

We already have the ID stored in the collection variables, therefore we can use it for the DELETE request as well by wrapping it in curly brackets in the request URL. Here is what the request in Postman should look like:

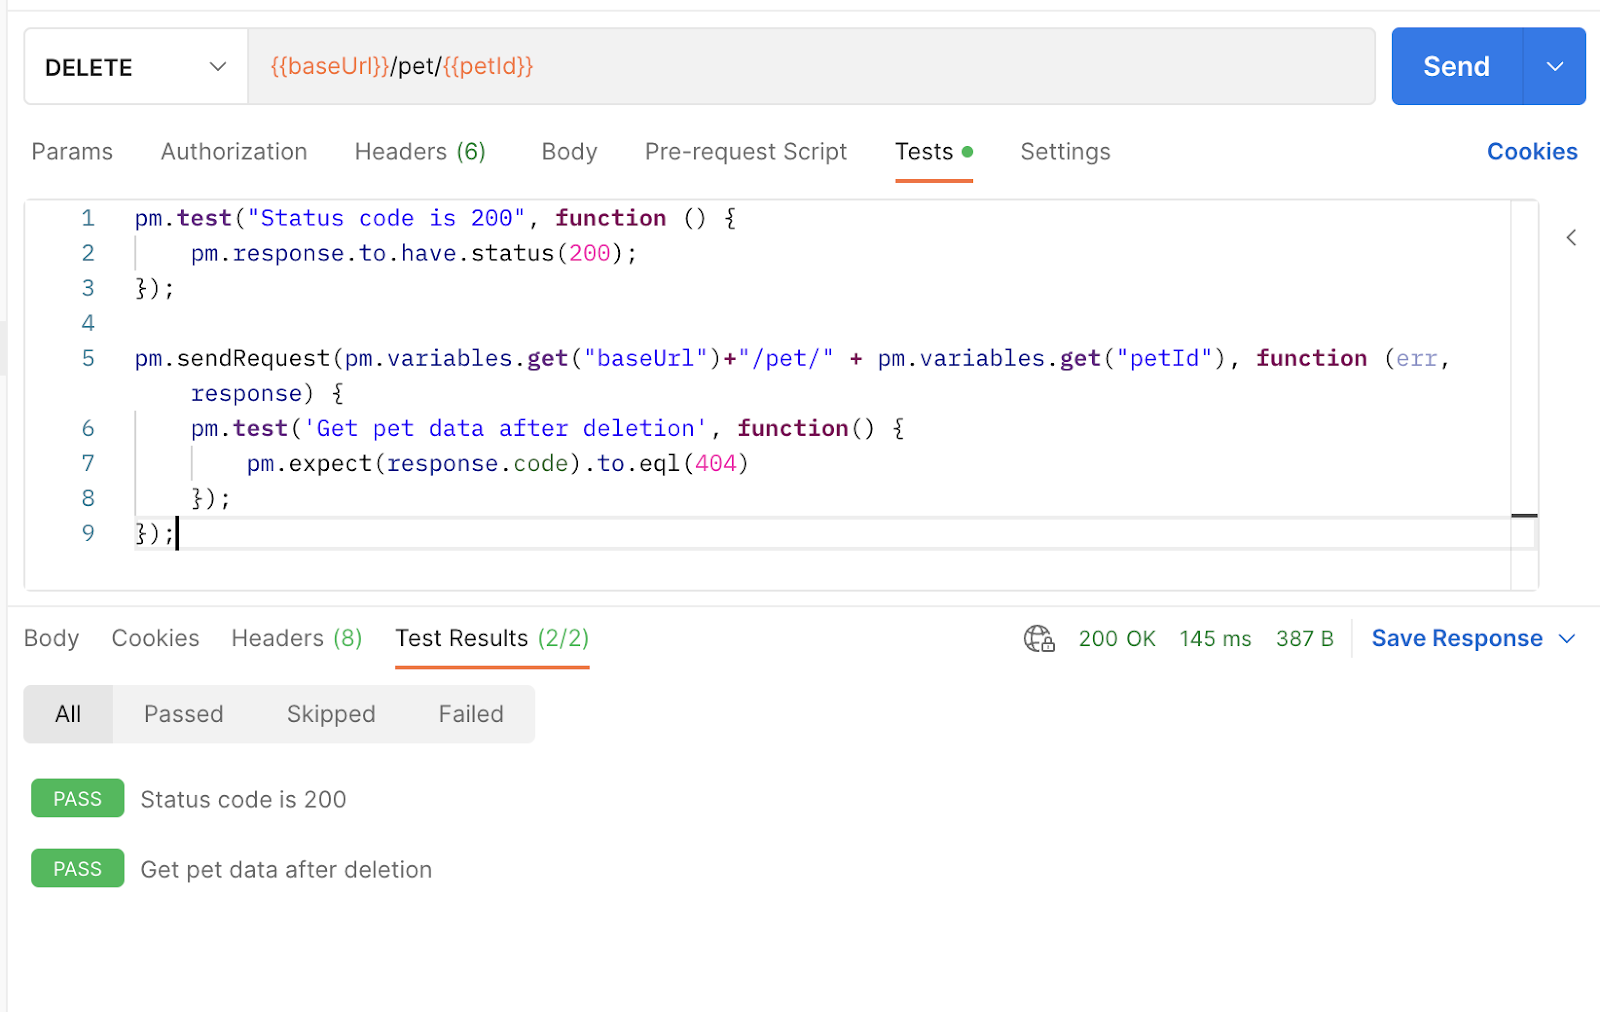
Before executing this request with the “Send” button, we should add tests first. This is because the DELETE request tests are more informative than the response body we receive. We can add one test to check if we receive the successful response status code 200. However, we can also check if the pet is actually deleted by using the GET request with the /pet/{petId} endpoint, which gives us information about a given pet with a specific ID.
For this request we should receive a 404 (not found) response status code because we previously deleted the pet with the stored ID and it should no longer exist. We can check this by sending the request in code via an already existing code snippet. This code snippet can be found under “Send a request” name. In the test, for this request, we expect that the response has a 404 (not found) status code, so it should look like this:
pm.test("Status code is 200", function () {
   pm.response.to.have.status(200);
});


pm.sendRequest(pm.variables.get("baseUrl")+"/pet/" + pm.variables.get("petId"), function (err, response) {
   pm.test('Get pet data after deletion', function() {
       pm.expect(response.code).to.eql(404)
   });
});
Now we can execute the request and observe test results. Tests should have passed.
Wrapping it up
We covered the four most commonly used API requests (GET, POST, PUT, DELETE), added them in Postman, looked at responses, added tests for expected data from responses and analyzed the results. From our example test cases using the Petstore API, we can agree that Postman is a really simple and user-friendly tool to use when exploring and testing APIs.
Specifically, using Postman for API testing has many benefits:
- It has a user-friendly interface that is easy to use.
- APIs can be visualized better, making them simpler to understand.
- Stored API requests in a collection can be easily exported and afterwards shared with the whole team.
- Its pre-built JavaScript code snippets are very useful for people with little to no knowledge of programming languages and enable them to build effective tests.
- Automation engineers can construct more advanced tests relatively easily and can fully automate the whole API by generating test data in pre-request scripts for each request, storing variables in collections and environments.
- Authorization and authentication of APIs is also possible and easy to use.
- The same tests for the API can be run in different environments.
- The API can be documented as well as easily monitored.
As we mentioned earlier, the tests that we performed here are really simple, but in the real world they should be more comprehensive, the data should be tested more thoroughly, and the use case scenarios should be followed more precisely. If you want to learn more about how to write tests in Postman you can read Postman’s documentation for writing tests. Furthermore, you can explore their learning center to find out what other features they offer for API exploring and testing.
Have fun learning and working with Postman.
Need help testing your API using Postman? We have a dedicated team of API experts with experience using various tools and technologies. Contact us to learn more about our API testing services and how they can benefit your organization.