Most of us are familiar with the term “auto clicker” which is usually a piece of software or hardware designed to interface with game consoles, computer screens, or smartphones and is essentially a simple way of simulating human interaction with the GUI. More advanced mechanical solutions, specifically designed to use touch screens and imitate the human touch, gesture or button pressed on the display. At TestDevLab, we use sophisticated automated testing setups that have a need for simple and fast interaction with the software to set up test scenarios that require certain steps of preparation. In some cases we just need to be able to control mobile devices remotely.
In 2019, Apple introduced a very useful new feature for iOS 13—the ability to connect Bluetooth/USB peripherals. Though Android had already had this feature for years, iOS also introducing this feature opened up some new possibilities for test automation. In this blog post we will look at how it’s possible to perform automated UI testing for mobile applications using a modified bluetooth mouse.
What inspired us to create a Bluetooth mouse for automated UI testing?
The idea to create and use a Bluetooth mouse for automated UI testing first came to us after hearing Jason Huggins’ speech at Appium Conference 2019. At the conference, Huggins talked about using robots for automation and mentioned the new iOS 13 feature and how it could be used for test automation with a mouse. He even showed a brief demo of it. I strongly recommend watching his presentation, great stuff.
We really liked the idea of using a Bluetooth mouse for test automation and decided to work on it and add all the missing parts to make it a viable automation tool. Previously, when performing automated UI testing for mobile applications, we used a custom built Tapster robot named Tappy to control the smartphone via Appium scripts. This, however, proved to be too mechanically limited so the next approach was… to use mice for catching the bugs in the software.
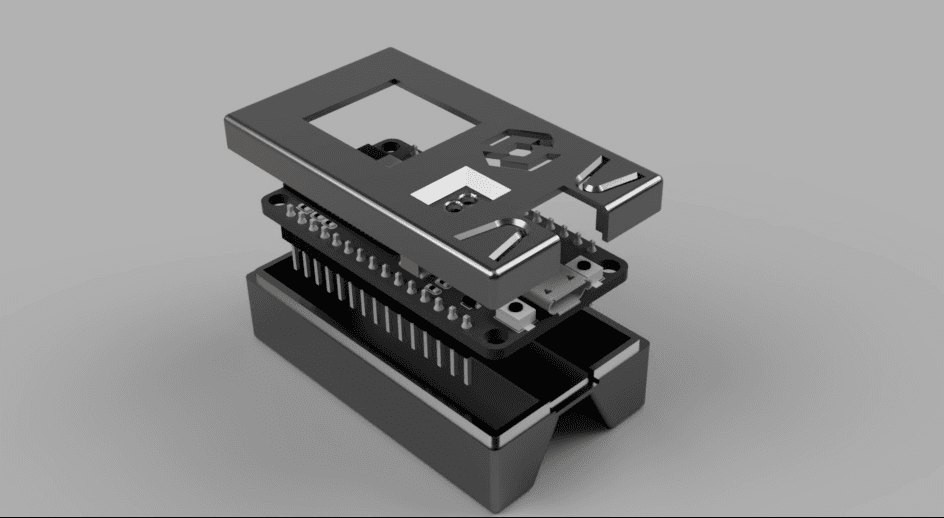
How our Bluetooth mouse works
We created a Bluetooth mouse tool that handles mouse/keyboard actions and coordinates the mouse movements via serial port from an Appium driver. The hardware we use has evolved over the years. We first started with an RN-42 Bluetooth HID device which has its own firmware to act as a mouse, keyboard or game controller. We even tried a few hacks to build a prototype of a cheap HC-06 Bluetooth dongle with the firmware from an RN-42 Bluetooth HID device. The HID device accepted raw binary HID messages and had some problems with communication.
More recently, though, we moved to the Espressif ESP32 platform with our own Arduino firmware. The firmware uses an OpenSource library that can make ESP32 act as a Bluetooth mouse/keyboard/gamepad controller and manages the Bluetooth HID stack for us. The serial AT commands that control the Bluetooth mouse and keyboard from the computer use a proprietary command interface. So what remains is to wrap the command interface in the programming or scripting language of choice and connect it with Appium or another test automation framework.

Once we can move the mouse, the next step is to decide where. Because I want the mouse to work everywhere on the system, it makes sense to read the screen visually. Therefore, the next step is to take a screenshot directly from the device with its screen size. For mobile platforms this can be done by using command line utilities like the Android Debug Bridge (ADB) for Android devices and libimobiledevice or Xcode Instruments for iOS devices.
Now, after the screenshot is received, we need to find the element to click. For that a template matching mechanism is needed. So, instead of writing locators, you have to prepare images that can be found in screenshots and train your AI model to match the UI even after some minor changes. The simplest way to do this is to use tools like SikuliX to resolve the problem of UI element location.
By following Huggins’ example, we created an Appium driver that communicates with client libraries via the well-established JSON Wire Protocol and the WebDriver Protocol.
Elements are actually images of icons/buttons because element detection is happening visually based on screenshots. As for now, icons are being located using a simple template matching algorithm which works perfectly fine when icons are extracted from a screenshot with the actual device resolution. In the future, a more sophisticated image matching algorithm should be used that can handle scale variations or other image mutations—if the main purpose of the automation is to make it work in a robust fashion, not to validate the changes. When an icon is found in the screenshot, the location becomes known. This makes it possible to move the mouse to that location and click on or perform other mouse actions like swipes or pinch gestures. If an element is not found, the searching is repeated until the timeout has been exceeded.
Here is the automation flow inside the framework or test controller:
- Start Bluetooth mouse Appium driver script;
- Read the mobile device screen and compare the given image/file with the logos/elements on the screen;
- Proceed with the functions defined in the script to move the mouse and click on the UI element coordinates;
- When the Bluetooth mouse completes the given script, switch to the Appium driver scripts.

What are some problems with automated UI testing?
Now, what does this approach to test automation bring to the table and why should you care? Let’s take a look at some problems associated with automated UI testing problems and see how our Bluetooth mouse can fix them.
Demo preview
Some of the problems with running UI tests with drivers provided by Appium or other testing frameworks like Espresso and UIAutomator are:
- App under test is modified (not always);
- Automation will work only on apps with element trees (cannot automate games or native apps that are production builds);
- Application should be prepared for automation by developers (Apple);
- Automating OS native applications, settings, switching over applications or browsers in same scenario;
- Drivers are platform dependent and require a custom approach for a cross-platform solution.
Let’s look at these issues a bit closer and see how our mouse solution will fix them.
App under test is modified for test automation
When we are testing mobile apps the goal is to mimic the usage of real users. If by default the app under test is being modified to run tests, technically it means that this specific app that is being tested will never be used by a real user, as the real user will get an app that is not modified for testing. This might not be a big issue, especially if there are manual acceptance tests executed, but it does pose some risks. Also, automation will slightly decrease performance of the app.
The Bluetooth mouse works with unmodified applications
Tests can be executed with any application or OS native software the same way as the user would interact with the input devices. There is still a small performance hit in the current solution—screenshots. Constantly taking screenshots will decrease performance. But who knows, real users also might capture screenshots frequently. This could be fixed by a different element detection approach. This problem is very common in iOS test automation. To be able to automate iOS applications, it should be specifically built for it or well configured. There might be a need to automate rival applications in which case it won’t be possible to get developer approved versions. With the Bluetooth mouse it’s possible to install any application from the App Store and automate it without any problem.
Problem with automation that works only on apps with element trees
So what about apps that are dynamically drawn by raw graphics engine—games? You can’t access elements there by using a driver that traverses the element tree. This doesn’t really matter for the mouse. Mouse events will still work regardless of the application. Because element detection is visual, it also doesn’t care about the context. So technically it’s even possible to automate actual games.
Automating the system (settings)
There might be tests that depend on specific system setups, like wi-fi, bluetooth, mobile data, etc.. While frameworks like Appium allow modifying these settings with capabilities, it doesn’t exactly mimic real usage. The mouse will work system wide and is not anchored to any app. You can simply put the app to the background, open settings, change them, and get back to the app. Or you can even automate scenarios that include usage of multiple applications. Everything that is on screen can be clicked, just like a real user would do. There is often a practical need to automate helper actions during the mobile software performance tests, so the lesser the external impact on the results, the better. The mouse connection to the phone can be automated to set up the device and then disconnect, leaving no energy or network communication impact during the performance measurement.
Drivers are platform dependent
Every automation driver is platform dependent which means that cross-platform tests will need a different setup for iOS and Android devices. This might not be a real issue, just an inconvenience. The mouse is almost platform independent. It will work on any device that supports a Bluetooth mouse, be it iOS, IpadOS, Mac, Android, Windows or even a Raspberry (Linux) device. However, the only problem is that it is platform dependent when taking screenshots. Therefore, this part should be taken care of separately for each platform. This multi-device compatibility allows us to produce mouse clicks and keyboard input, emulating any HID button we need that can be found on a keyboard. The only question is whether the OS recognizes it. Although the input controller response times are quite comparable with the mechanical devices, in the automation loop there is a delay problem with getting feedback from the current state of the Application. By using ADB for Android, it takes about 2 seconds to capture a screenshot which is very slow. One solution would be to use an external screen capturing device like a camera. This would provide multiple benefits:
- It doesn’t affect device performance.
- There is a much faster response time.
- It is platform independent.
But the biggest downside to this is the extra hardware. The only reason to use a Bluetooth mouse instead of a robot is that it doesn’t need so much hardware, using a camera kind of defeats the purpose. Another problem is screen calibration. When using screenshots, you get an image in screen resolution which makes it very easy to navigate with a mouse as the screen coordinates can be received from the screenshot. Fortunately, some work is in progress to address this issue so stay tuned for the updates.
Sounds interesting?
You can try setting up your own simple automation like this and perform automated UI testing for mobile applications, however, a more robust and complete project can take a lot of your time and require more expert knowledge. To learn more about mobile test automation and boost your knowledge on the subject, you can check out some TDL school courses to help you get started.
Luckily, test setups with hardware/software automation is our speciality. Get in touch with us and we will reduce your efforts even more and create a custom test automation setup for your software products!


